
Configuring Thunderbird to Work and Play Nice with GMail
This tutorial is going to explain how to configure Thunderbird 3 to work the best with GMail.
In Thunderbird 3, the account creating wizard makes it easy to connect to GMail, but there are a lot of different settings that need to be adjusted to make the program work even better. This tutorial will explain how to adjust all the settings so that Thunderbird will works as smooth and properly as possible with GMail.
As example of a problem, if you don’t specify your search and folder settings properly, you will get duplicate messages making it hard to find aynthing when you search. Another example is that when you delete items through Thunderbird, it will create an additional Trash label in GMail.
One more thing to note: For security reasons, I will not be using any extensions or plugins for Thunderbird. Let’s get started!
- Configuring your GMail Account
- Adding your GMail Account to Thunderbird 3
- Configuring Thunderbird 3 for the Best Settings
Configuring your GMail Account
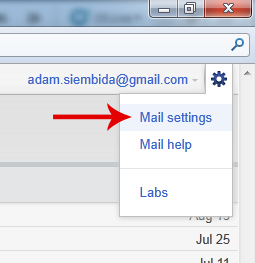
The first thing you have to do is configure your actual GMail account. To do this, log into your GMail and then click on the gear icon in the top right corner of your email, then Mail settings. For some reason Google decided to use a nearly identical icon as the settings icon in Internet Explorer 9, so do not confuse the two. You can see where to click in the screenshot below.
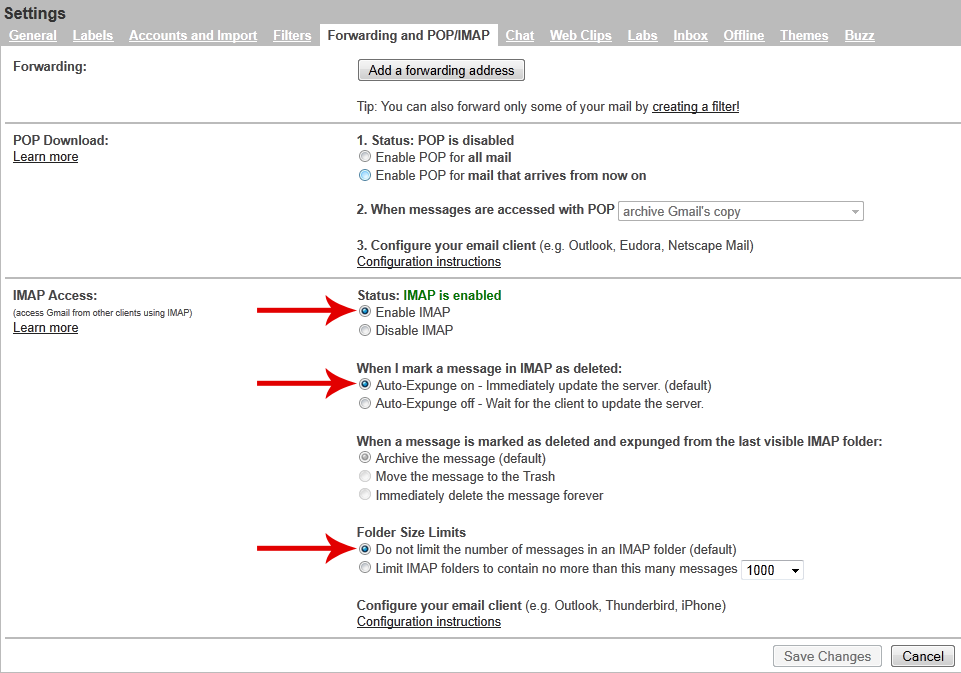
Now that you are in the settings, click on the Forwarding and POP/IMAP tab. The settings you want to choose are Enable IMAP, Auto-Expunge on, and Do not limit the number of messages in an IMAP folder. You can see the correct settings in the screenshot below.
Make sure to push Save Changes when you are done with this tab
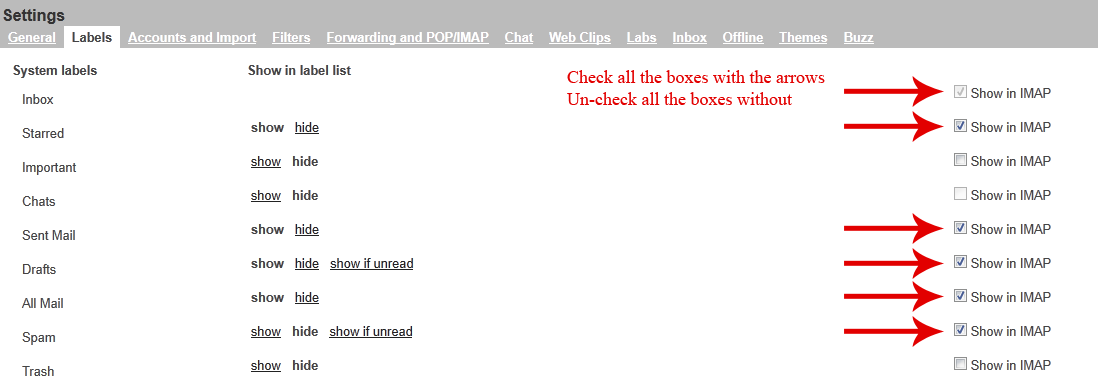
The last settings we need to change are located under the labels tab. Under System labels you can see your usual GMail labels. In Thunderbird these will show up as folders. For each label that you want to appear in Thunderbird, you need to check the corresponding Show in IMAP checkbox. Under the System labels, check the Inbox, Starred, Sent Mail, Drafts, All Mail, and Spam. Un-check all of the other boxes unless you want them to appear in Thunderbird as a separate folder. I decided to un-check some GMail features like their Important and Chats labels, because part of the reason I use Thunderbird is to get away from all the feature bloat, social networking, and advertising that Google keeps throwing in my face.
Make sure, however, that the all the labels with arrows (except for Starred which is up to you) are checked.
Adding your GMail Account to Thunderbird 3
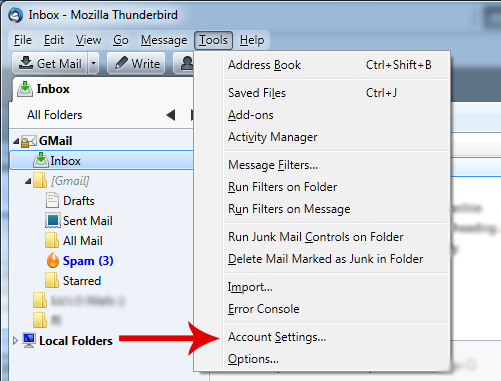
Now that your GMail account is all set up and ready for Thunderbird, we are ready to add the account in Thunderbird. Click on Tools > Account Settings…
Next click on Account Actions > Add Mail Account…
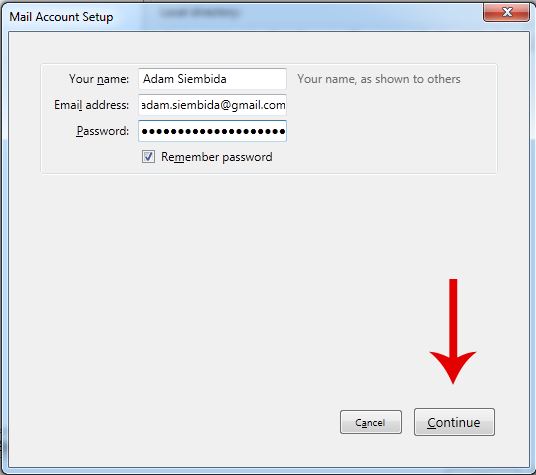
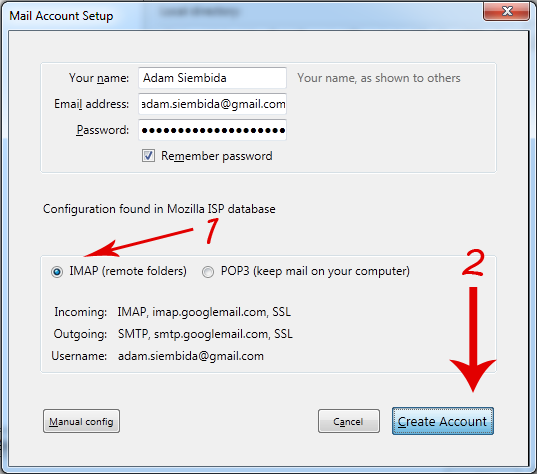
Now type in your gmail settings and push Continue. Thunderbird will automatically configure the server deails, and unless something went wrong, you should see the screenshot below. Make sure that IMAP (remote folders) is selected, and press Create Account.
Configuring Thunderbird 3 for the Best Settings
Now that your account is created, you could technically start using Thunderbird for your email. But we will make sure that all the settings are set in the best way possible to make work nicely. If you just added your account, the Account Settings window should still be open. If it is not, click on Tools > Account Settings… from the main menu.
Server Settings
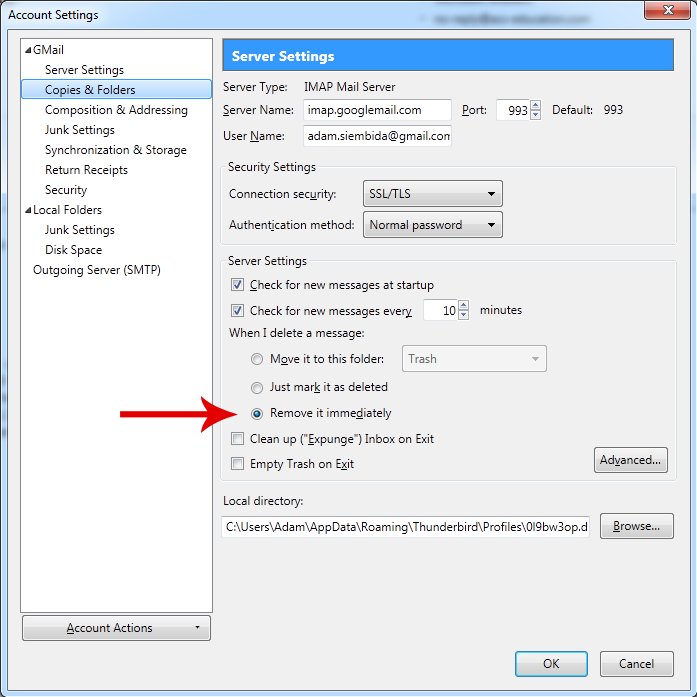
To start, click on the Server Settings item. The first thing we will do is make sure that deleting messages is handled properly. Under When I delete a message choose Remove it immediately. If you leave it as Move to this folder: Trash, GMail will remove still get rid of the messages from your Inbox, but it will also create a new label called something like Gmail/Trash and tag all of your deleted messages with it. This won’t ruin anything, but why have an extra label that does nothing.
The other settings under Server Settings like Check for new messages at startup, or Check for new messages ever X minutes don’t matter because in IMAP, everything happens in real time automatically. Here is how I have it set:
Copies & Folders
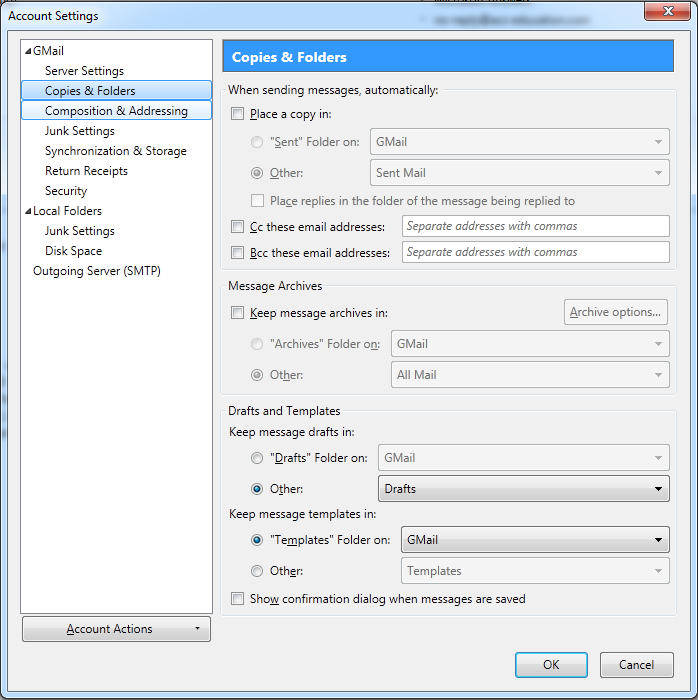
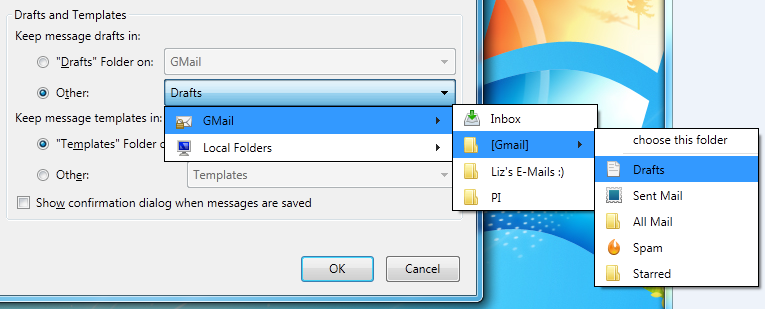
Next, click on Copies & Folders. This page is important. Just look at my settings in the image below and set it exactly the same. What you are doing here is telling Thunderbird not to save copies of sent messages, becaues GMail automatically does that for you, and automatically places it in the Sent folder. I am not sure what Message Archives does, but I know that you don’t need it. By setting the Drafts options, we are telling Thunderbird that to save any unfinished emails in to GMail’s Drafts folder on the web. If we left it as the default settings, when you save an un-finished message, it would store locally on your computer. This means that if you logged into GMail from a different computer, the saved message would not be there. I don’t use Templates, so I just set it to GMail so that if I ever did, they would be synced with the GMail server.
Here are the proper settings:
Here is how you set the Drafts folder:
Junk Settings
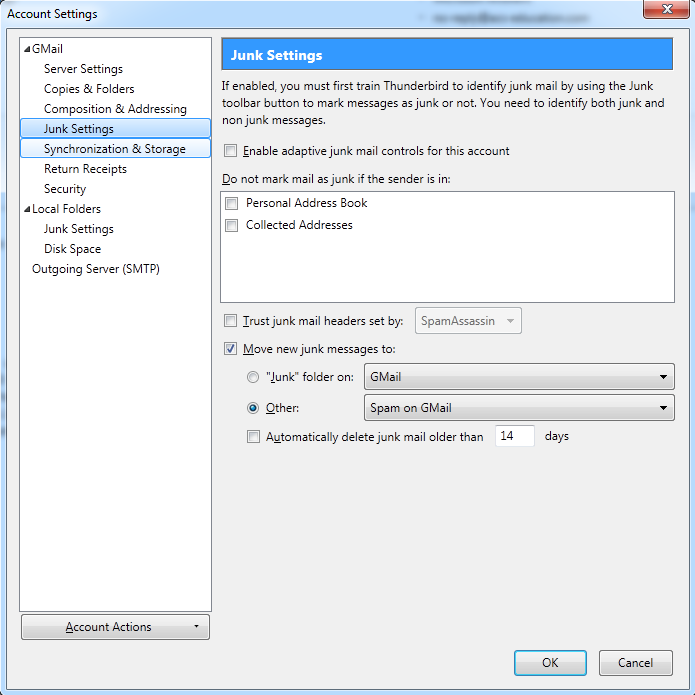
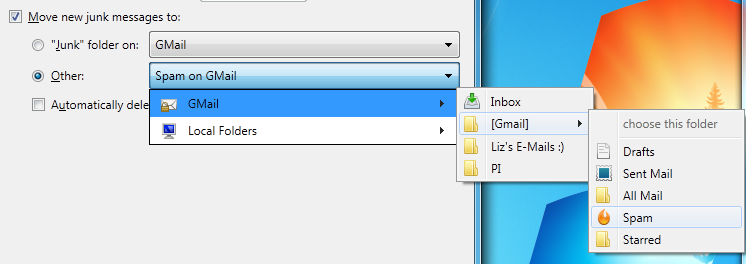
The next thing we have to fix is the spam/junkmail settings. Click on the Junk Settings page and make the settings how I have them in the screenshot below. GMail already has built in spam control which works very well, so we don’t need to use the Thunderbird built in spam control. I have my email posted right on my website, free for anyone to see (including spam-bots crawling the web to harvest emails) and I rarely have a single spam message slip through. Under Move new junk messages to, choose Other and set it to the Spam folder on GMail. This makes any messages marked as Junk (the terminology Thunderbird uses) go into GMail’s spamp folder. This way if a spam message ever slips through, you can mark it as spam simply by clicking the Mark as Junk button within Thunderbird. If you didn’t set this up, marking messages as spam from within Thunderbird has no effect.
Here are the proper settings:
Here is how you set the Spam folder:
Synchronization & Storage
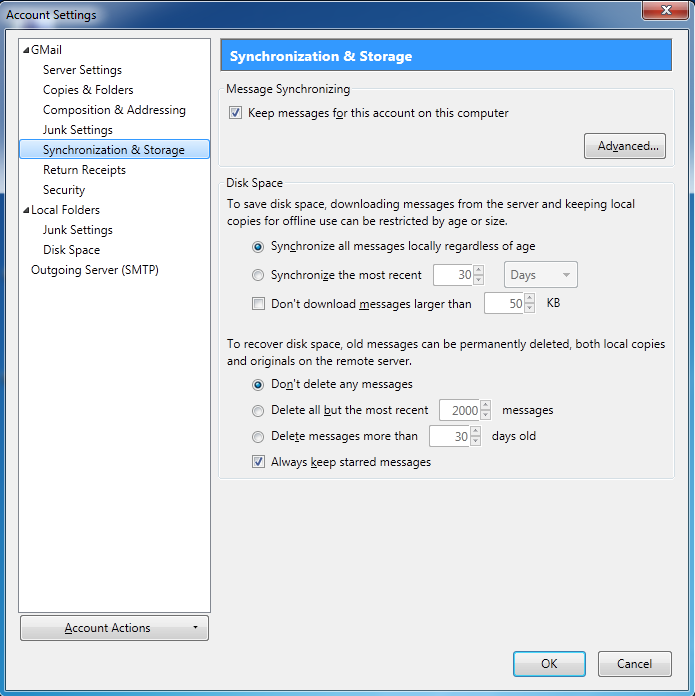
Next open the Synchronization & Storage page. Here we are going to make sure that Thunderbird downloads all the messages, regardless of their age, and stores them forever. This way you will have access to all of your email messages, even if you don’t have an active internet connection. It also means that Thunderbird won’t have to re-download the messages if you try to open something that hasn’t been downloaded before. The last thing this does, is that it makes searching from within Thunderbird work very well, since what would be the point of searching if you were only looking at 10 percent of your messages?
Below are the proper settings:
Now we are done with the Account Settings menu, so click on the OK button.
Options Menu
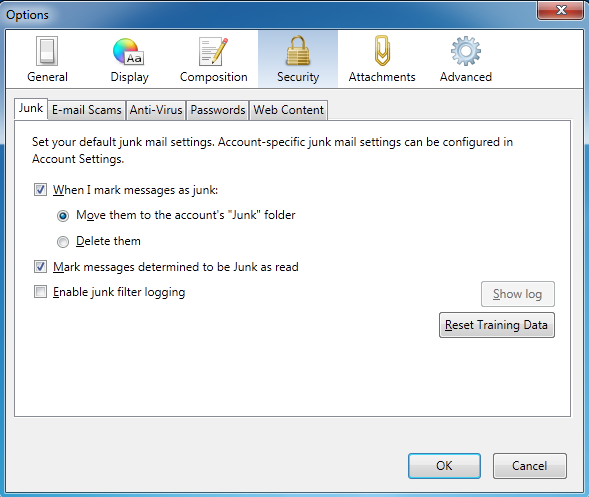
Next we have to do some finishing touches in the Options menu. Click Tools > Options to open it up. Click on the Security icon, and then the Junk tab. Check the box next to When I mark messages as junk > Move them to the account’s “Junk” folder. For some reason, unless you do this, when you mark a message as spam, it will get marked as spam, and just sit there… This makes it so that if you mark a message, it immediately gets tossed in the Spam folder and it’s gone. Here is a screenshot of the settings:
Now while the Options menu is still open, click on the Composition icon, and then the General tab. I left everything here as default for my personal setup, but here is where people might want to change settings. Where it says Auto Save every X minutes, some people like to put it to something more frequent, for example save every minute. The problem with setting it too low is that because Thunderbird is saving the message to the GMail Drafts folder, you will get a message that it is sending something every time it backs up your draft. It can get annoying very fast. Click the OK button to save and exit out of the Options menu.
Search Settings
We are nearly done! The last thing we need to do is make sure that when you are searching for messages, that you don’t have duplicate messages coming up. If you have a message in the Inbox, it will automatically also be in All Mail. So when you search, Thunderbird will actually find both, and show you both. To make sure that this doesn’t happen, one by one, perform the following procedure on every folder except All Mail, Drafts, and Sent Mail.
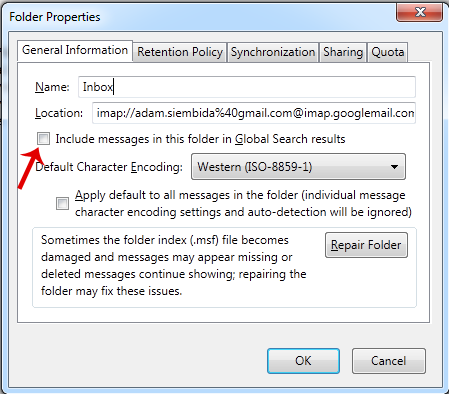
Right click on the folder located in the bar on the left of the program and select Properties. Un-check the box next to Include messages in this folder in Golabl Search results. Push OK.
When you are doing the Spam folder, you should also click on the Synchronization tab, and then un-check Select this folder for offline use. This will keep Thunderbird from download hoards of useless Spam and taking up space on your hard drive. Keep in mind that you will still be able to look inside of this folder just like you would any other folder. The only difference is that you might not be able to do it offline, and sometimes it might take a little longer to load.
Favorite Folders
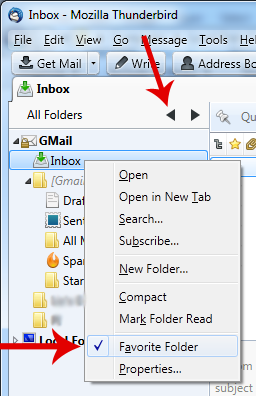
The last thing to do is completely optional, but you can right-click on a folder, and mark it as a Favorite Folder. This way you can mark all the folders you use as favorites, and then you can click the black triangle shaped arrows (I marked it with a red arrow) to change your view.
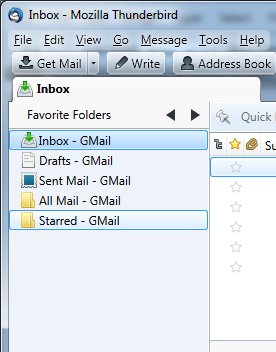
Keep clicking the arrow until it says Favorites and only shows the folders you marked as a favorite. Doing this lets you hide the Spam folder, which will eventually fill up with hundreds of unread spam messages, and you have to keep right-clicking on it, and then doing Mark Folder Read if you are as compulsive about it as me! Here is how the final setup should look. Nice and neat, and functional.
Finishing Touches
The last thing you might want to do is log back into GMail, and delete any of the labels that Thunderbird automatically created before you had it configured like this.
Wow this was long! Hopefully it was worth it and will help you configure Thunderbird to play nice with GMail! If you have any questinos (or if you have some tips that I missed which you would like to share) feel free to leave a comment!
Leave a Reply