
Adding Spice Models to LTspice
This tutorial is going to cover adding custom Spice models into your LTspice simulations and library. While it is very easy once you know how to do it, there are a couple pitfalls that can cause serious headaches if you are unaware.
- Finding and Downloading the Spice Model
- Adding the Spice Model to your LTspice Library
- Using the Spice Model in a Circuit
- Conclusion and tl;dr (too long;didn’t read)
Finding and Downloading the Spice Model
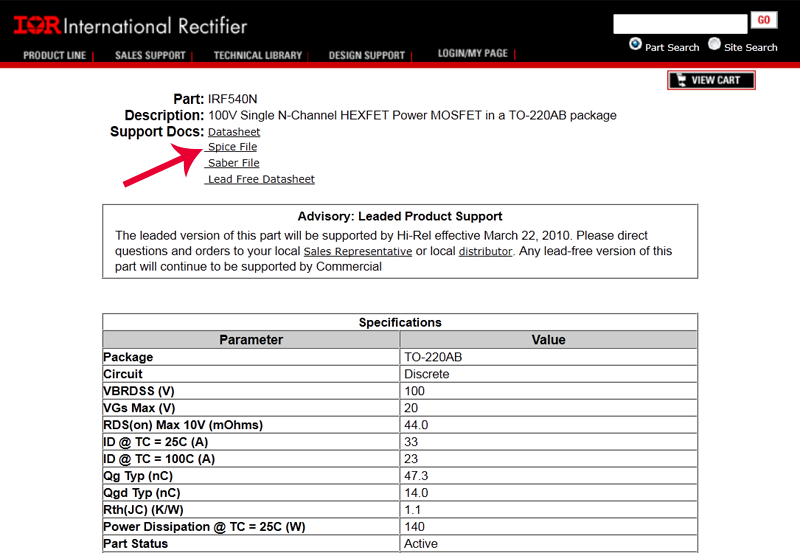
It might seem obvious, but the first thing you need to do is find a suitable Spice model. This can usually be done in one of two ways. The easiest method is to simply Google the phrase “[part I am looking for] spice model”. If the part is popular enough and isn’t some incredibly complex part, your search will usually turn up some hits. The second method is to directly search the part manufacturer’s web page for the part. Sometimes you will have to switch tabs, or it will simply be link on their part’s web page such in the following screenshot:
An unfortunate characteristic of the Spice world is that over time it has become fairly fragmented. Different design tools use different versions of Spice, hence, part manufacturers will often have the Spice file for their part available in a couple different formats. The best format to use is the Spice3 model, however the PSpice model will usually work in LTspice as well.
Once you have found the model you want to use, you need to make sure it is in the correct format with the correct extension. A Spice model file is nothing more than a text file with a different extension. In the case of LTspice, if the model file contains only a single model, it should be named with the .sub extension. If the file contains multiple models, then the file should be named with the .lib extension.
I’m not going to go into depth on renaming text file extensions, however one method to do it is to first open up the model in notepad (in Windows 7, right click on the file > open with > notepad). Next, go to file > save as. Where you type the file name in the file name text box, type the exactly desired file name in quotes, and the program will name it exactly that. For example you could type 1N4148.sub. If you tried typing the file name without the quotes you would get 1N4148.sub.txt instead of the desired 1N4148.sub.
Adding the Spice Model to your LTspice Library
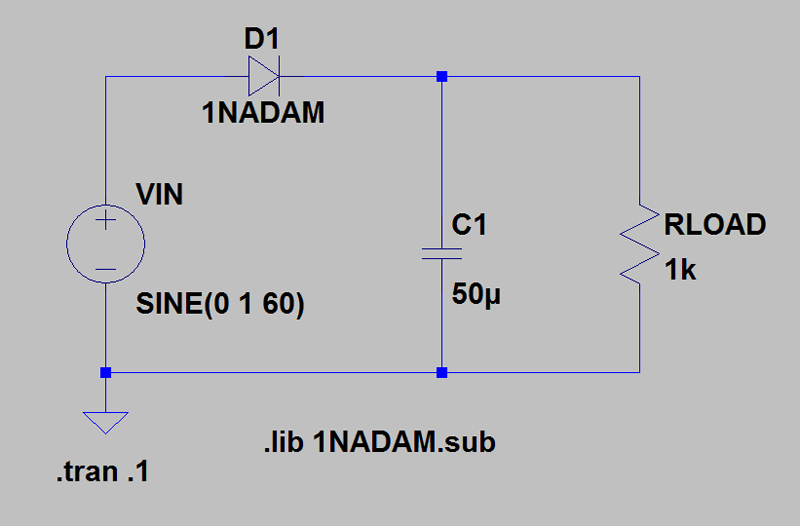
For this tutorial we will be using a Spice model for a made up diode called the 1NADAM, named after your beloved engineer, me! You can either download the file here (righ click on link > save as), or simply copy the code below, paste it into a text document, and save it with the .sub (or .lib) extension as explained in the previous section.
*
******************************************
*
*1N4ADAM
*
*
*Spice model for a made up diode used in
*my LTspice adding models tutorial at
*https://www.adamsiembida.com/
*
******************************************
*
.SUBCKT 1NADAM 1 2
*
*
R1 1 2 5E+9
D1 1 2 INTDIO
*
.MODEL INTDIO D
+ IS = 7.0E-9
+ N = 1.5
+ BV = 30
+ IBV = 0.00025
+ RS = 0.20
+ CJO = 5.0E-13
+ VJ = 0.80
+ M = 0.030
+ FC = 0.50
+ TT = 3.0E-9
.ENDS
*
As you can see, inside of the file for the 1NADAM there are .SUBCKT and .MODEL statements. Most Spice models downloaded from the internet will have .SUBCKT statements, because often time a simple .MODEL statement will not sufficiently model the complex behavior of modern parts. I am assuming that the reader knows the difference between a .SUBCKT and .MODEL (explaining those thoroughly is a topic for another tutorial). In short, however, a .MODEL statement will provide the model for an existing Spice primitive (i.e. a capacitor, resistor, transistor, diode, and so on). While .MODEL statements will work for simple simulations and old parts, it will not be very accurate for newer, smaller parts. For example, transistors have become so small and non-ideal, that the equations which we all learned in textbooks do not provide sufficient accuracy for good simulation results.
This is one case where a .SUBCKT model becomes very useful. This allows a manufacturer or engineer to create a more complex model using more than a single Spice primitive, which will lead to better results. This also allows manufacturers and engineers to create models which take into account any peculiarities or quirks that the component might have. You will be hard pressed to find a model for a real part which uses a single .MODEL statement for the Spice model. Therefore this tutorial assumes a .SUBCKT type model but will point out the difference where applicable.
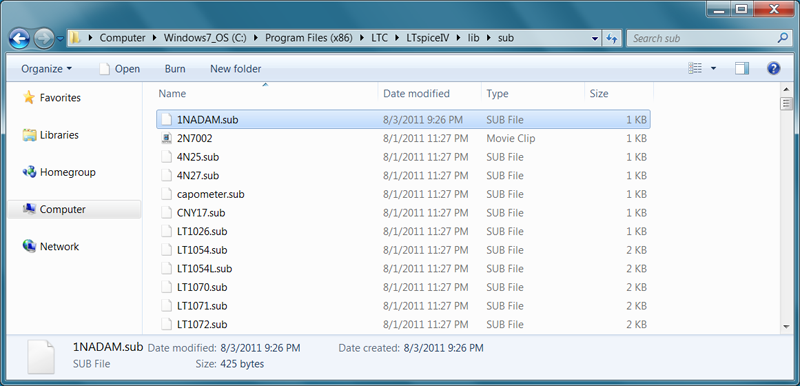
Once you have the Spice model on your computer, adding it to your LTspice library is very easy. Simply copy the file to your LTC\LTspiceIV\lib\sub folder. Usually the full path to that directory will be either C:\Program Files (x86)\LTC\LTspiceIV\lib\sub on a 64 bit Windows 7 installation or C:\Program Files\LTC\LTspiceIV\lib\sub on a 32 bit (x86) Windows installation.
Using the Spice Model in a Circuit
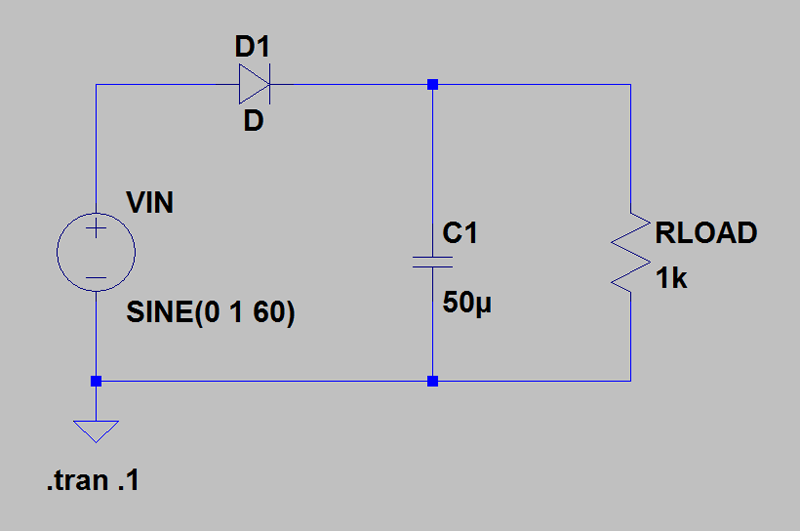
Now that the Spice model is in your library, there are a couple things you need to do. The first is make the circuit which will contain our part. For example, here is a simple half-wave rectifier I have tossed together.
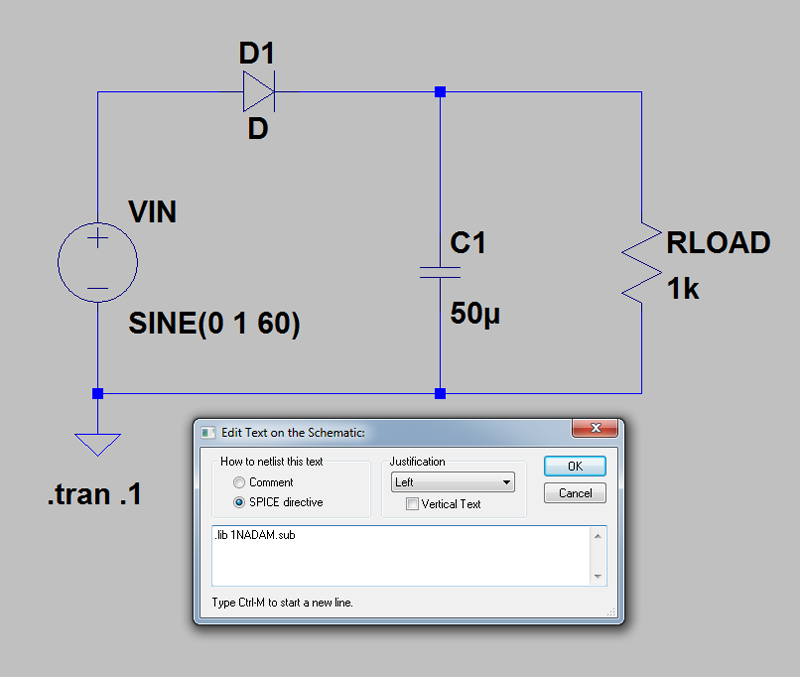
The next is to let LTspice know that you will be using that the newly added file. You do this by placing a Spice directive (s shortcut key, or the .op button on the toolbar) onto the schematic containing .lib FILENAME, using the entire name of the file containing your model. Make sure to include the file extension! This is the first pitfall I was talking about. Here is an example of how to correctly add our new file:
.lib 1NADAM.sub
While the above way is correct, below you can see a common mistake which will not work:
.lib 1NADAM
Here you can see some screenshots showing how to add the spice directive on to the schematic.

In case some of you are wondering what exactly this does, it includes any models included in the specified file into the Spice simulation file. You might also be wondering what the difference between the .LIB and .INC directives is. The .LIB directive will only add models from the specified file. If you had some other directives in there, for example a .TRAN statement, it would be discarded. The .INC directive will include everything in the specified file into your project, regardless if it is a model, directive, netlist, or anything else. So use .LIB just to be safe in case there is some other junk in there (even though there shouldn’t be).
Now that you have added the file, you can simply use any .MODEL or .SUBCKT included in the file as you would with any of the default components. Just right click on a component’s default model (in this case the D right next to the diode), and change its value to the name of the model inside of the file. Alternatively you can hold ctrl then right-click on the symbol and change the value in the Value row). Usually you have to look inside the file using a text editor to see what exactly the author of the Spice file called the model. For example the model for the 1N4148 diode might not actually be called 1N4148 inside of the file.

Here is also where the second major pitfall comes in.
If you are using a .SUBCKT type model for a Spice primitive, you need to change the Spice prefix on the component!.
What the Spice prefix does is tells LTspice what kind of model to expect for the part. For example, on a diode, the default will be a D because, well, the part is a diode so it expects a diode model. Remember however that we are not using a regular diode model for our diode; we are using a .SUBCKT model. This means that we need to change the Spice prefix to a subcircuit model instead of a diode model. To do this, hold ctrl and then right-click on the symbol in the schematic. Then just double click in the Value cell next to Prefix, and change the value to an X.

At this point the file should be ready to simulate and look like this:
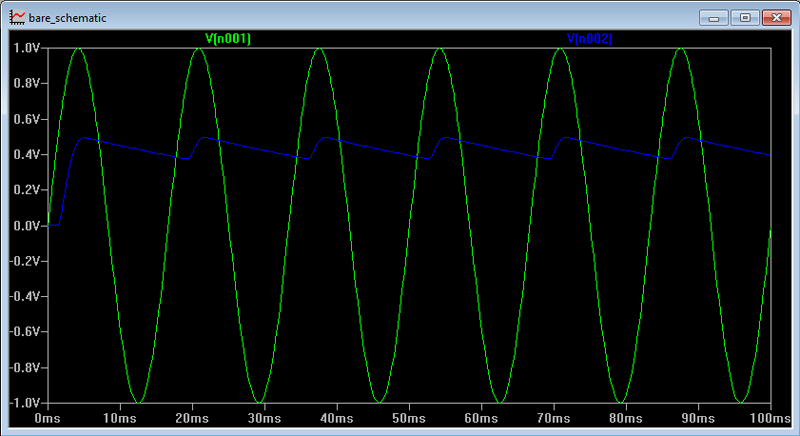
Congratulations, everything should be working now! We can run a simulation to see what comes out. Keep in mind that this circuit not meant to be a good rectifier. I purposely chose the values to make it easy to see what this circuit is actually doing just by looking at the output. Here is the result:
Conclusion and tl;dr (too long;didn’t read)
This article was much longer than I initially expected, and probably more than was really needed. However, what inspired me to write this tutorial was that when I was just starting to learn LTspice, I would read instructions people posted on forums, but I didn’t exactly understand what all the steps meant or how to perform them. For example I had no idea what “change the Spice prefix to X” meant, and I had no idea that you had to hold ctrl then right-click on the symbol to do it. In summary, here is a quick tl;dr version for people who might already be familiar with Spice and LTspice, and just want the quick and concise procedure. This will also serve as a good recap for people who read the entire article!
- Download and rename the Spice model to something that makes sense
- Move the Spice model into the
subfolder in your LTspice directory - Add a
.LIB FILENAMEdirective onto your schematic - Change the Value field for your symbol to the name of the model inside of your Spice model file
- If you are using a
.SUBCKTtype model for a Spice primitive, hold ctrl then right-click on the symbol and change the Prefix field toX
17 Comments
-
Thanks a lot for your work. In addition to official manuals such tutorials may be very helpful. Especially for beginners like me. Particularly accentuating properties that might seem insignificant at first sight (as the difference, for example, between the .LIB and .INC directives). In this connection I have got one newbie's question too. Suppose we need a diode. When we press the diode button on the toolbar and place the diode symbol on the schematic, we get quite a working diode that is nothing but one of the LTSpice' primitives. Right? The question is: Where is the model for this primitive stored? And how can I see the characteristics of this very diode?
-
Quince Jackson
This is great information. I am saving it for future reference.
-
Bob Thurmond
Thanks Adam. This is very helpful. I've used Spice in various forms for many years but never really became much of an expert at it. LTSpice is certainly one of the easiest versions to use but their general lack of models is very frustrating! This should help a lot! Bob
-
Frederick
This is the only version of these instructions that I have found that is helpful. Thank you! You could not be more wrong when you say "This article was much longer than I initially expected, and probably more than was really needed." - NO. Good details. Thanks again.
-
Suzanne
Hi Adam, I am a newbie also and trying to add in an OPA 625 op amp from TI. It is a SPICE model and I am using LTSpice. When following your tutorial I find I only have .lib, .tsm and .tld in the downloaded model folder. There is no .sub file or .txt doc. Would appreciate if you could guide me in the right direction.
-
Bijesh Mohan
Great article. I'm just a beginner to both Spice and LTspice. Thank you for this valuable information. I'm saving this article in my Pocket app.
-
Anonymous
Thanks a lot! Found out "how to add .sub model" from a long time. I come from China.
-
Jiang
Thank very much!
-
Menoss45
i have a problem here , i make a library diode 1N4007 , when i start simulation , that pop up "Unknown subcircuit called in: xd1 n004 n002 d1n4007". anyone have solution here ?
-
sparky
trying to add a new transistor to standard.bjt in ltspice4. It doesn't show up in the list of replacement transistors. In fact I rename standard.bjt to something else so there is NO standard.bjt and I still get the same list. Is it reading the available parts from some other place
-
R
Thank you for the detailed step-wise explanation in this matter! I believe it will help many people....R
-
Riaan
Thanks for the great info. BTW, after wasting multiple hours trying to get a new transistor model added on Windows 10, I finally figured out that the latest LTSpiceXVII uses the Documents\LTspiceXVII\lib\cmp folder, not the installation folder. Do you mind adding this info to your page? It would be great if this helps someone from pulling their hair out! Thanks.
-
Tiffany
Thank you so much! After spending hours trying to follow other forums and posts on how to import a new component into LTSpice, your tutorial did the trick. Very nice!
-
Folks reading this excellent how-to article incorporating an LTSpice diode model may also be interested in reading my instructable article "How to use a chip vendor op-amp model in LTSpice" https://www.instructables.com/id/How-to-Use-a-Chip-Vendor-Op-Amp-Model-in-LTSpice/
-
Jindrich
Thanks, great info.
-
Steve
Thanks man! The X in the prefix was the missng part which kept me nagging the whole yesterday afternoon..
RAGBIR CHANA
I am new to ltspice. This was a great tutorial. LT;DR not a problem. I like to completely thoroughly solve the problem for once and all. Many thanks.