
HP 50g Basic Graphing Tutorial
Graphing on the HP 50g took me a while to get used to. You have to go through a few separate menus to create a nice looking graph. This threw me for a loop because I was used to a calculator that had most the options for creating a graph in one place. Here is a little guide that will get you acquainted with the very basics of creating a graph on this calculator. There are three main steps.
NOTE: This (and all of my other) tutorial assumes that the calculator is in RPN mode. If you are not using RPN mode, take the time to learn it and you will be very glad you did!
Entering the Function
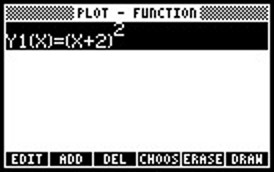
The first step is to enter the function. While holding LS (left shift) press F1. This will open up the list of functions to be graphed. Push the ADD soft button to open up the equation editor and enter the equation. Push ENTER to return to the function list. You can add as many functions to be graphed as you want, just keep pushing add and typing them in. In this example we will be graphing $ Y1(X)=(X+2)^2 $. Your screen should look like this.
Setting up the Tick Marks
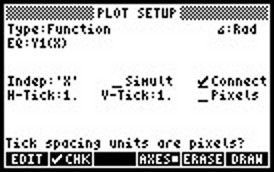
You might be wondering why you would need to adjust the tick marks. A very annoying feature of this calculator is that by default, the ticks correspond to pixels on the screen as opposed to the values of the independent variable. To change these ticks hold LS and press F4. This should open up the “Plot Setup” menu. To change the tick marks to correspond to the independent variable you need to remove the check mark next to “Pixels”. The value of the horizontal and vertical tick marks can be changed by adjusting the values of “H-Tick” and “V-Tick”. The “Plot Setup” menu should now look something like this.
Setting up the Window
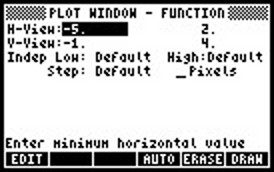
The final step is to set up the dimensions of the window. While holding LS press F2 to open up the “Plot Window” menu. The two values for H-View and the two values for V-View specify the dimensions of the graph. We will want to view the graph from $ -5 \lt X \lt 2 $ and $ -1 \lt Y1(X) \lt 4 $. The “Plot Window” menu should now look like this.
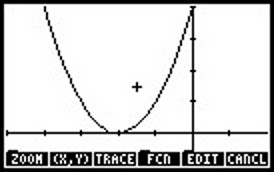
Once this is done we are ready to view the graph. press the ERASE soft button and then the DRAW soft button, and the graph should appear! If you don’t press ERASE, the new graph will be drawn over the previous graph and it will become a big mess. To change the window settings, you must first press CANCEL (which is the same button as the ON button). If you don’t first cancel out of the graph, you won’t be able to switch between the graph menus. The final graph should look like this.
A Few Tricks
There are a few tricks and buttons that took me a while to learn. Sometimes the menu at the bottom of the graph screen takes up too much space or hides a detail you want to see. To make hide/show the menu press either the + or – keys. If you know the range of the independent variable that you want to plot the graph over but are not sure what the resulting values of the function will be, in the “Plot Window” menu you can enter the values for H-View, and then push the AUTO soft key. This will automatically adjust the V-View values to accommodate the function.
6 Comments
-
Zach
When I try to use y=, or any of the plot functions an error appears stating that the ppar is invalid. Any help would be appreciated.
-
John
Pressing + or - to hide the soft keys seems to put you in a mode that traces out the cursor position. Another way to hide menu is to use MENU command. It toggles visibility of soft keys. Sometimes it is hiding in the selections under EDIT soft key, but usually it is available.
-
Bethany Carlton
When I try to plot the simple function f=|x2-1|, (absolute value of x square -1), I get a graph as if the absolute value wasn’t there…. Do you know what’s going on there?? Thank you
Henry Tayor
In the Plot Window, the Indep Low and Indep High are factory-set at "Default." To view a truncated graph for whatever reason, you can set either or both of those values. What I haven't yet found out how to do is return them to "Default." If you know, I would be grateful to hear from you. If not, that's okay, and I'm grateful for the clarity of this tutorial.